Ekspert Valheim Build uczy idealnych projektów dachu | Pcgamesn, wskazówki dotyczące budowy? Trudno jest budować stabilny dach: Valheim Obecné Diskuze
Dach Valheim
Aby uzyskać lepsze wsparcie w dalszych osiągnięciach niż 4 sztuki, musisz zacząć używać belki i słupów rdzeniowych i / lub żelaza.
Valheim Build Expert uczy idealnych projektów dachu
Istnieje niektórzy prawdziwi eksperci ds. Budowania Valheim, tworząc niesamowite struktury w grze przetrwania Iron Access Iron Gate. Na szczęście niektóre z nich z przyjemnością dzieli się swoimi technikami z innymi graczami, a najnowszy projekt jednego z takich niesamowitych architektów uczy kilku świetnych strategii tworzenia idealnych projektów dachu w grze rzemieślniczej.
Mając na imię, przyjazny gracz ma misję pomóc graczom Valheim w zaprojektowaniu chłodniejszych i bardziej realistycznych dachów dla ich domów i innych budynków. Jak wyjaśniają, rzeczywiste dachy mają tendencję do rozciągania się nad ścianami budynków, aby zapewnić one odpowiednie osłonę i umożliwić spację deszczu. Używając małych drewnianych wiązek, pokazują, jak budować „ramki dachu” wzdłuż krawędzi konstrukcji, aby zbudować na szczycie.
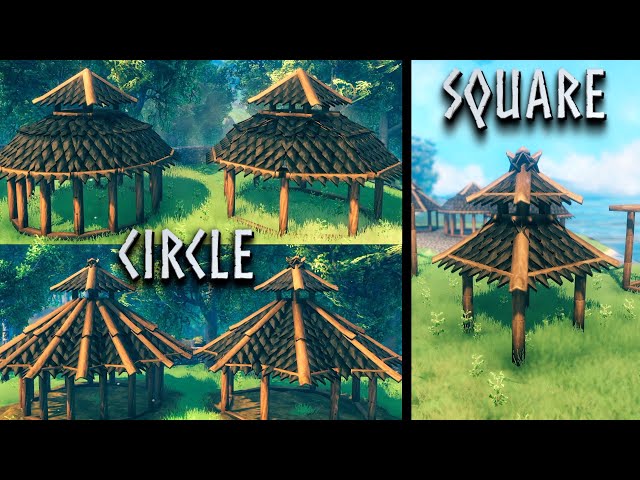
Po uzyskaniu podstawowej struktury przyjazny gracz ma wiele opcji, aby przenieść go na wyższy poziom. Używając jako przykładu dwóch różnych ujęć okrągłego budynku, pokazują, jak stworzyć podstawowe ramki dachowe dla okrągłej kopuły lub zaawansowaną ramę w kształcie strzałki, która daje bardziej wyglądającą konstrukcję dachu. Wyjaśniają również, jak budować wielopoziomowe dachy, aby uzyskać jeszcze bardziej snazzowe wykończenie, z wyraźnymi i zwięzłymi przykładami.
Możesz zobaczyć ich schematy strategii dachowej na Valheim Reddit, gdzie zdobyli już niezwykle pozytywną reakcję ze strony społeczności. Jeden z komentatorów zauważa nawet: „Jestem prawdziwym dekażerem, a sh*t, co robicie, jest imponujący i faktycznie tłumaczy się w prawdziwym życiu.„Jakby to było mało, mają inny zestaw alternatywnych wzorów, które opisują jako„ zbudowane od wewnątrz, a nie na zewnątrz.”
Jeśli nie masz pewności, co to znaczy lub jest bardziej uczniem wizualnym, przekładają to również na pomocną sześcioczęściową serię wideo. W momencie pisania, pierwsze dwie części są obecnie dostępne – pierwsze szybkie wprowadzenie do bardziej realistycznego dachu i drugie, pokazujące, jak budować swoje okrągłe projekty dachu i wypełnić luki w dachu w sposób, który jest zarówno funkcjonalny, jak i przyjemny do oka.
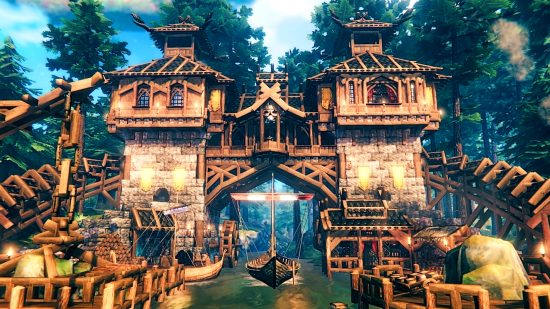
Przyjazny gracz nie jest obcy fantazyjnej kompilacji – deweloper Iron Gate wybrał je na wyróżnioną sierpniową wersję miesiąca Valheim Build of the Month, dość oszałamiającego mostu z (zgadłeś) kilka niesamowicie szczegółowych projektów wieży dachowej. Czy jest zatem lepsze miejsce, aby zacząć rozwijać swoje kompilacje niż z najlepszymi wskazówkami?
Wraz z niedawnym przybyciem Valheim na Game Pass i dodanie Cross Gromplay do jednej z najlepszych gier kooperacyjnych na PC, nigdy nie było lepszego czasu na rozpoczęcie przygody. Nadal nie mamy ustalonej daty premiery dla głównej aktualizacji Valheim Mistlands, ale z pewnością informujemy Cię o wszystkich najnowszych wiadomościach, jak się to zdarza.
Ken Allsop Ken chce zagrać w wszystko, ale nieuchronnie kończy się ponownie na Diablo 4, Dreamlight Valley, FFXIV lub Terraria. Uwielbia RPG, Soulslikes i Roguelilikes i nie przestanie mówić o Monster Hunter i jak smok.
Dach Valheim
![]()
5. zdubbingować. 2021 V 21.14
Rana původně dapsal:
Oto przykład domu, który zbudowałem, to wszystko dach i tylko 3 belki z bali do podtrzymywania całej powierzchni.
https: // imgur.com/qghv3fj
Z pewnością wygląda, jakby dach dotyka ziemi z tyłu, a jeśli tak, to również podtrzymuje dach i nadaje mu „uziemioną” stabilność, w której dach dotyka.
Gdziekolwiek kawałek jest uziemiony (niebieski), jest w stanie utrzymać (jak sądzę) 4 drewniane kawałki w dowolnym kierunku (w górę, w dół, bok, pod kątem) bez łamania.
„DAB Prevention Squad” xipho původně dapsal:
Próbowałem zbudować dach dla mojego nieco ambitnego domu. Prawie skończone, ale nie mogę dowiedzieć się, co zbudować, aby wesprzeć sam dach pod własnym ciężarem. Każdy ma jakieś przewodniki lub pomysły?
Aby uzyskać lepsze wsparcie w dalszych osiągnięciach niż 4 sztuki, musisz zacząć używać belki i słupów rdzeniowych i / lub żelaza.
![]()
5. zdubbingować. 2021 V 21.47
Gladi8er65 původně dapsal:
Rana původně dapsal:
Oto przykład domu, który zbudowałem, to wszystko dach i tylko 3 belki z bali do podtrzymywania całej powierzchni.
https: // imgur.com/qghv3fj
Z pewnością wygląda, jakby dach dotyka ziemi z tyłu, a jeśli tak, to również podtrzymuje dach i nadaje mu „uziemioną” stabilność, w której dach dotyka.
Gdziekolwiek kawałek jest uziemiony (niebieski), jest w stanie utrzymać (jak sądzę) 4 drewniane kawałki w dowolnym kierunku (w górę, w dół, bok, pod kątem) bez łamania.
„DAB Prevention Squad” xipho původně dapsal:
Próbowałem zbudować dach dla mojego nieco ambitnego domu. Prawie skończone, ale nie mogę dowiedzieć się, co zbudować, aby wesprzeć sam dach pod własnym ciężarem. Każdy ma jakieś przewodniki lub pomysły?
Aby uzyskać lepsze wsparcie w dalszych osiągnięciach niż 4 sztuki, musisz zacząć używać belki i słupów rdzeniowych i / lub żelaza. Z tyłu znajdują się 3 belki z bali, dachy nie na ziemi
https: // media.Discordapp.netto/załączniki/819903434383163413/827212179329122314/nieznane.png
Po prostu podaję przykład, jak daleko możesz posunąć się z dachem i belkami z bali bez problemów
![]()
(Zabanován) 5. zdubbingować. 2021 V 22.43
Jak zbudować dach (valheim)
Podczas gdy budynek w Valheim jest dość intuicyjny, jedną z części konstrukcji, która może być trudna, jest uzyskanie ładnego dachu na twojej konstrukcji. W tym przewodniku założymy, że czujesz się komfortowo budując fundament i ściany, a dach jest tym, z czym walczysz. Mając to na uwadze, spójrzmy na kilka prostych metod budowania dachów w Valheim.
Metoda nr 1 – prosty dach
Kilka rzeczy, o których należy pamiętać, postępując zgodnie z tą metodą:
- Wykonanie dachu jest znacznie łatwiejsze, jeśli utworzysz plan podłogi, który wykorzystuje liczby parzysty – na przykład podkład 2 × 10 lub 4 × 10, a nie 3 × 9.
- Ten dach wykorzystuje 26 ° Peices, więc upewnij się, że używasz ich przez cały czas.
- Musisz umieścić drabiny, aby dotrzeć do dachu. Ponieważ dekonstrukcja zwraca wszystkie Twoje zasoby, nie martw się o spamowanie drabin wszędzie, ponieważ możesz je zniszczyć, kiedy skończysz.
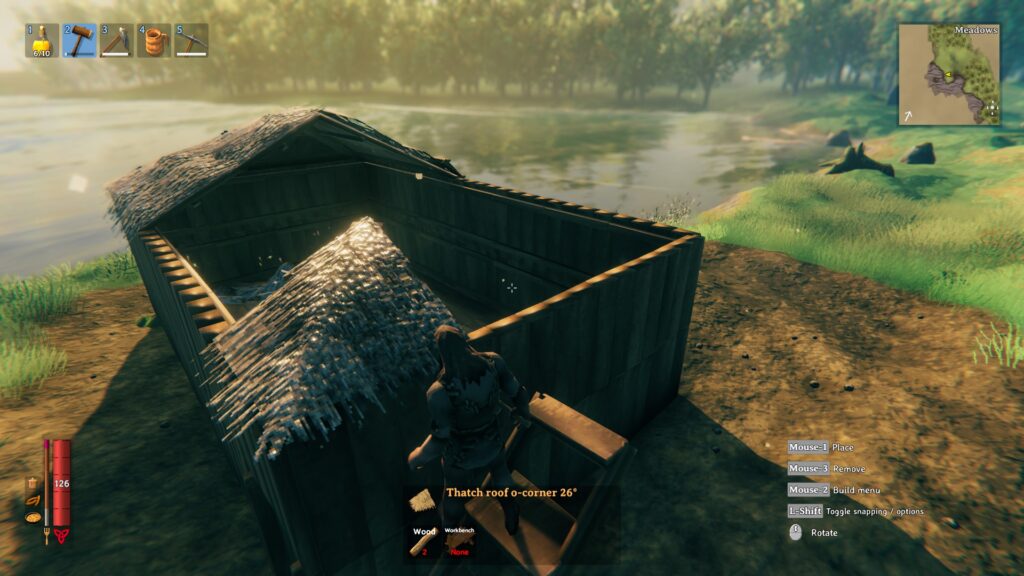
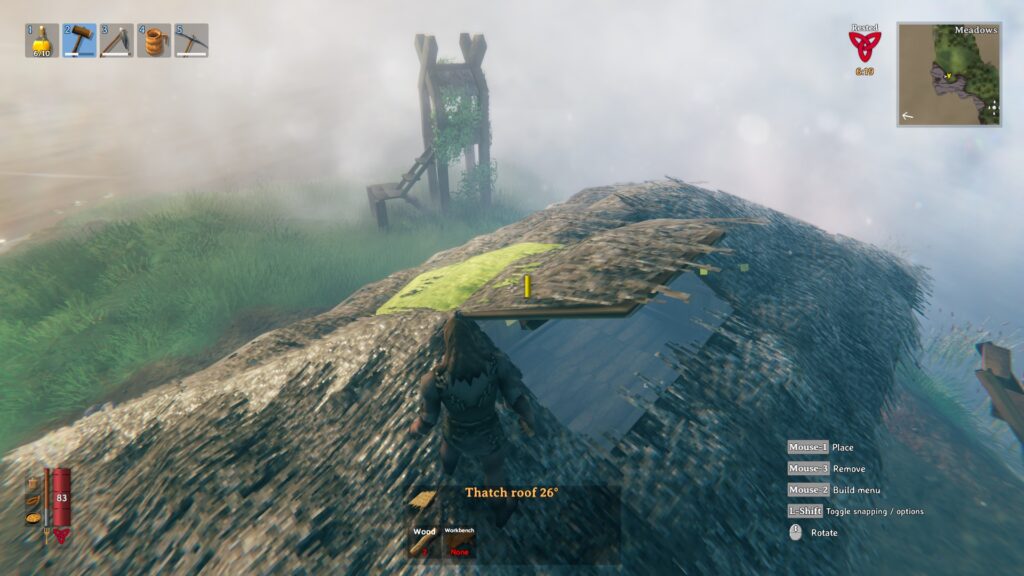
- Gdy masz podłogę i ściany, zacznij od umieszczenia elementów narożnych. Wybierz róg dachu strzechy 26 ° z menu budynku menu rzemieślniczego młotka i umieść jeden na każdym rogu.
- Następnie umieść strzechą 26 ° kawałki między rogami ze wszystkich 4 stron.
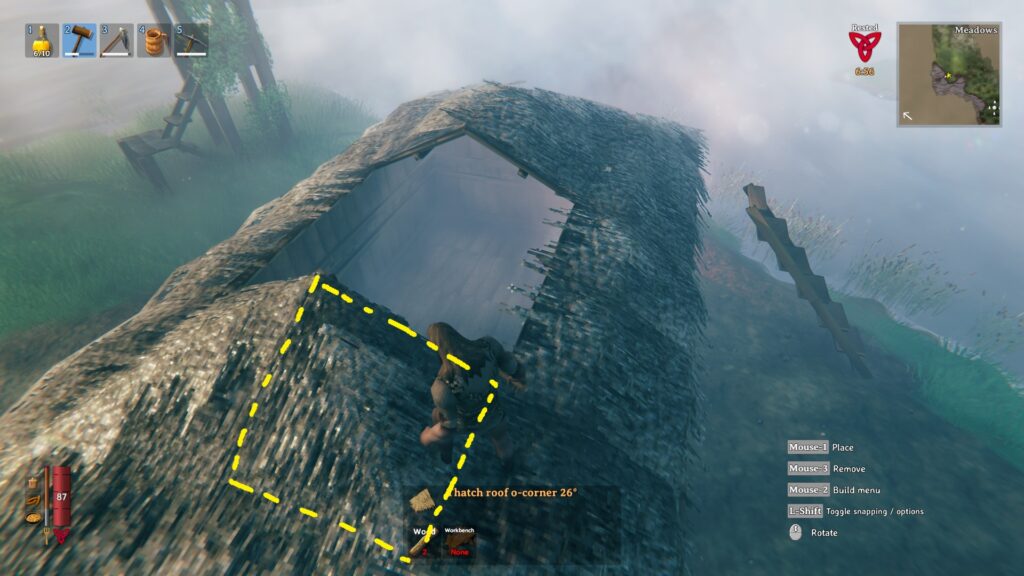
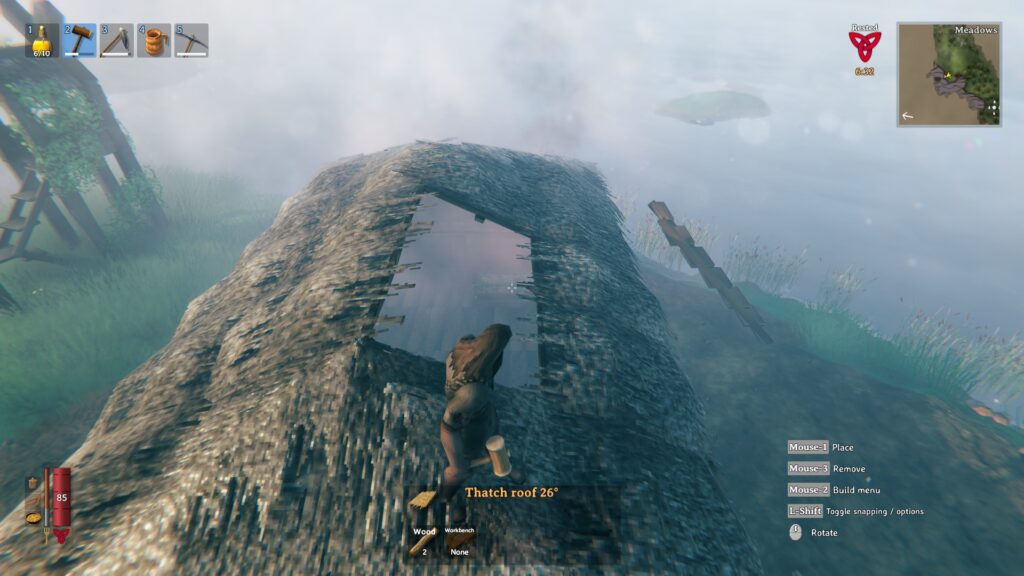
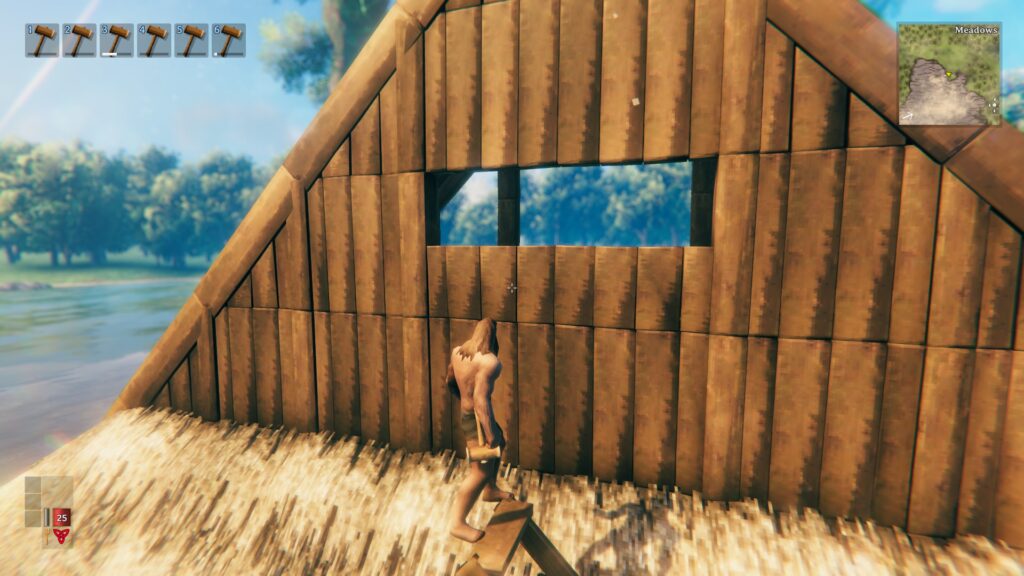
- Teraz przychodzi część, w której niektórzy gracze utkną: musisz umieścić więcej sztuk dachu strzechy 26 ° po przekątnej do wewnątrz Z miejsca, w którym umieszczasz oryginalne zakątki, tworząc górną krawędź dachu (patrz zdjęcie 3 poniżej). Umieść 2 z tych elementów, jak na zdjęciu na każdym końcu dachu.
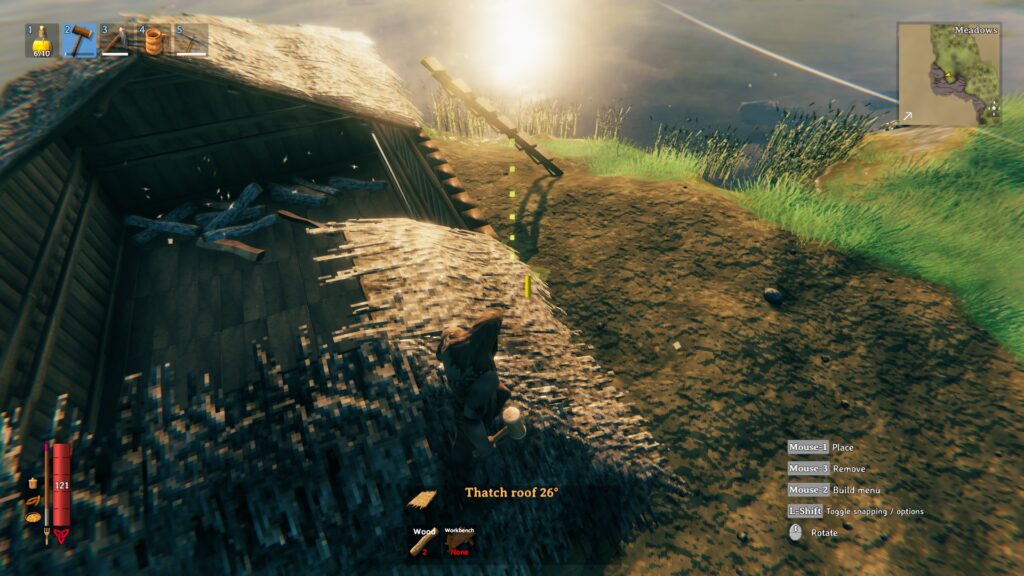
- Następnie wypełnij szczeliny dachem strzechym 26 ° kawałków.
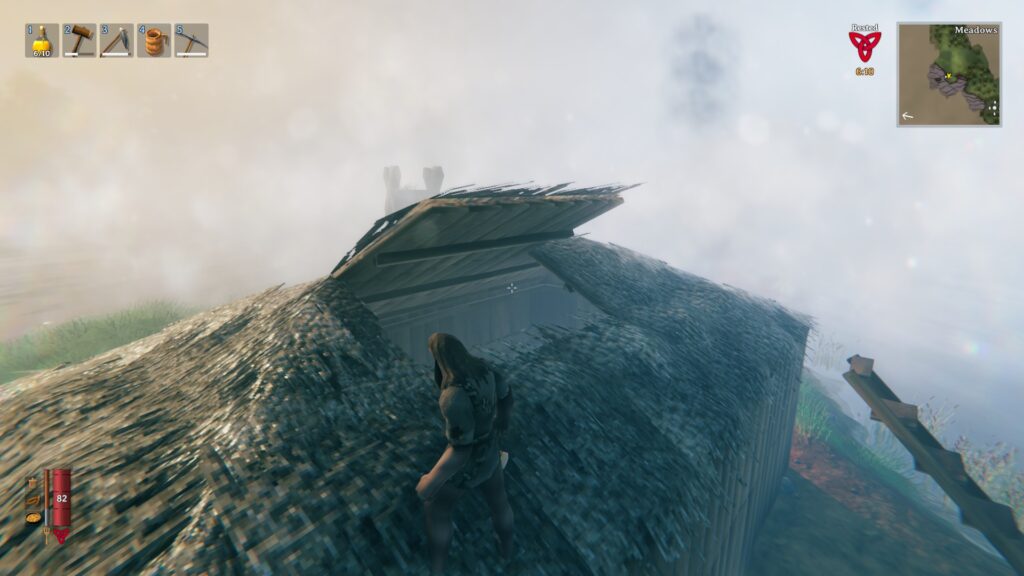
- Po złożeniu pożaru w pobliżu łóżka w środku, wróć na dach i wyjmij sekcję dachu bezpośrednio nad pożariem. Następnie wymień ten kawałek dachu jednym skierowanym w przeciwny kierunek jako inne płytki, aby stworzyć wentylację.
Metoda nr 2 – wysoki dach
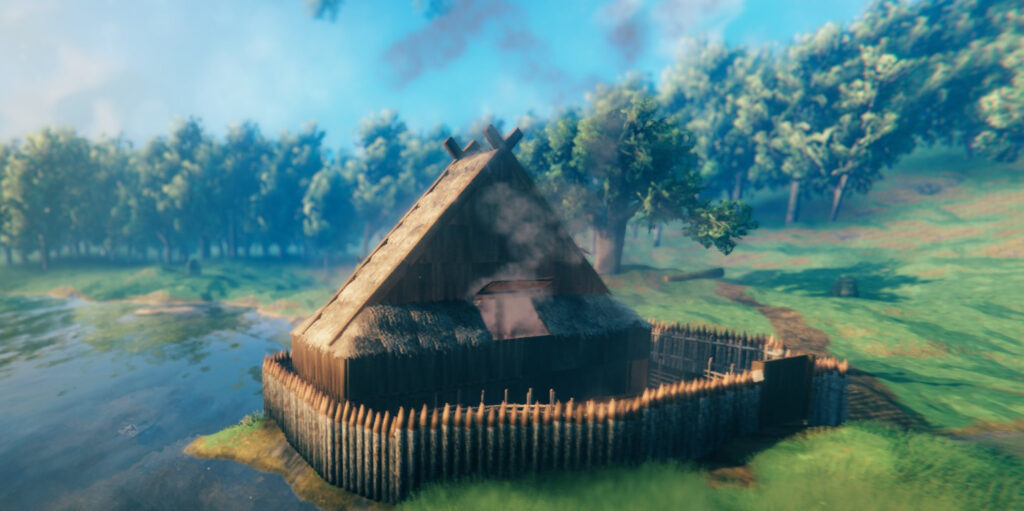
Jeśli chcesz zbudować coś bardziej imponującego, ta metoda nauczy Cię, jak budować większe, wyższe dachy dla swoich konstrukcji. Pokażemy Ci, jak stworzyć dach na zdjęciu powyżej, a także omówić, jak stworzyć wsparcie dla wyższych konstrukcji.
Kilka rzeczy, o których należy pamiętać, postępując zgodnie z tą metodą:
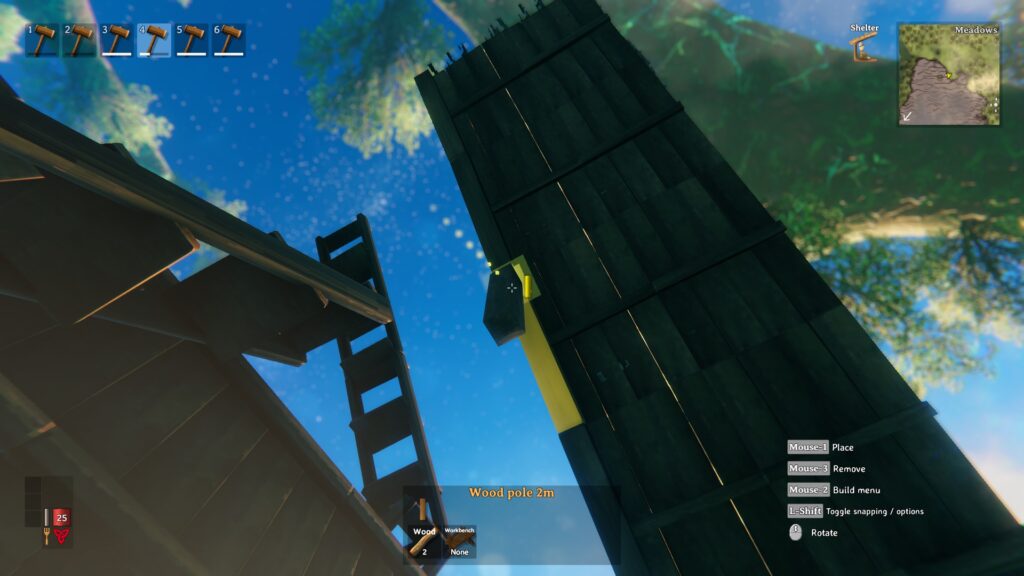
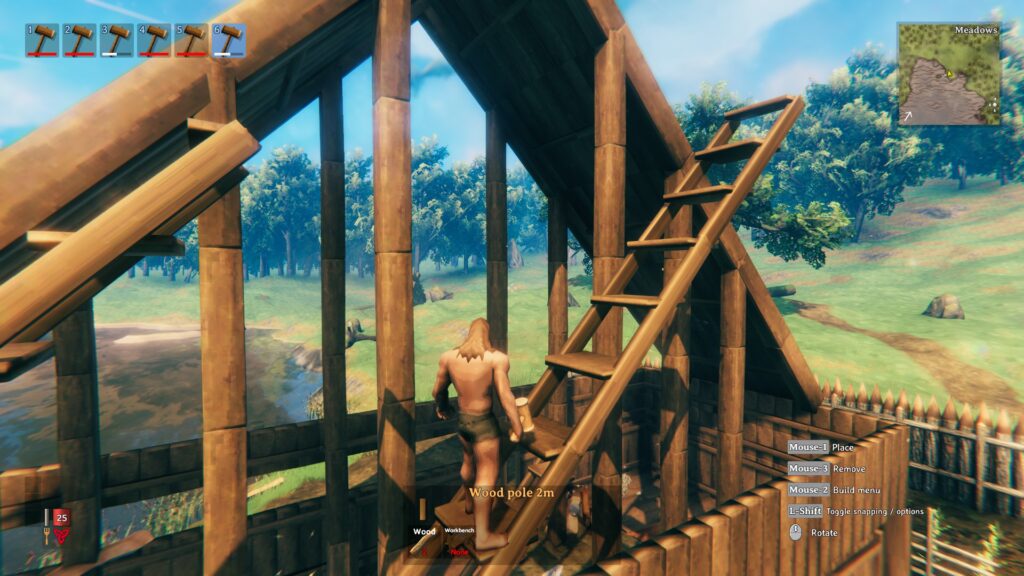
- Możesz umieścić tylko do 5 sztuk z ziemi, zanim następny kawałek się rozpadnie – Z wyjątkiem pionowych wiązek. Aby tworzyć wyższe konstrukcje i padające elementy wsparcia, musisz po prostu gromadzić się w górę z wiązkami, aby stworzyć filary wsporcze pod elementami, które wymagają większej stabilności.
- Wykonanie dachu jest znacznie łatwiejsze, jeśli utworzysz plan podłogi, który wykorzystuje liczby równe – dla tego konkretnego dachu stworzyliśmy podłogę o 4 × 10.
- Ten dach wykorzystuje kawałki 45 °, więc upewnij się, że używasz ich przez cały czas (chociaż do komina możesz użyć kafelków 26 °.
- Musisz umieścić drabiny, aby dotrzeć do dachu. Ponieważ dekonstrukcja zwraca wszystkie Twoje zasoby, nie martw się o spamowanie drabin wszędzie, ponieważ możesz je zniszczyć, kiedy skończysz.
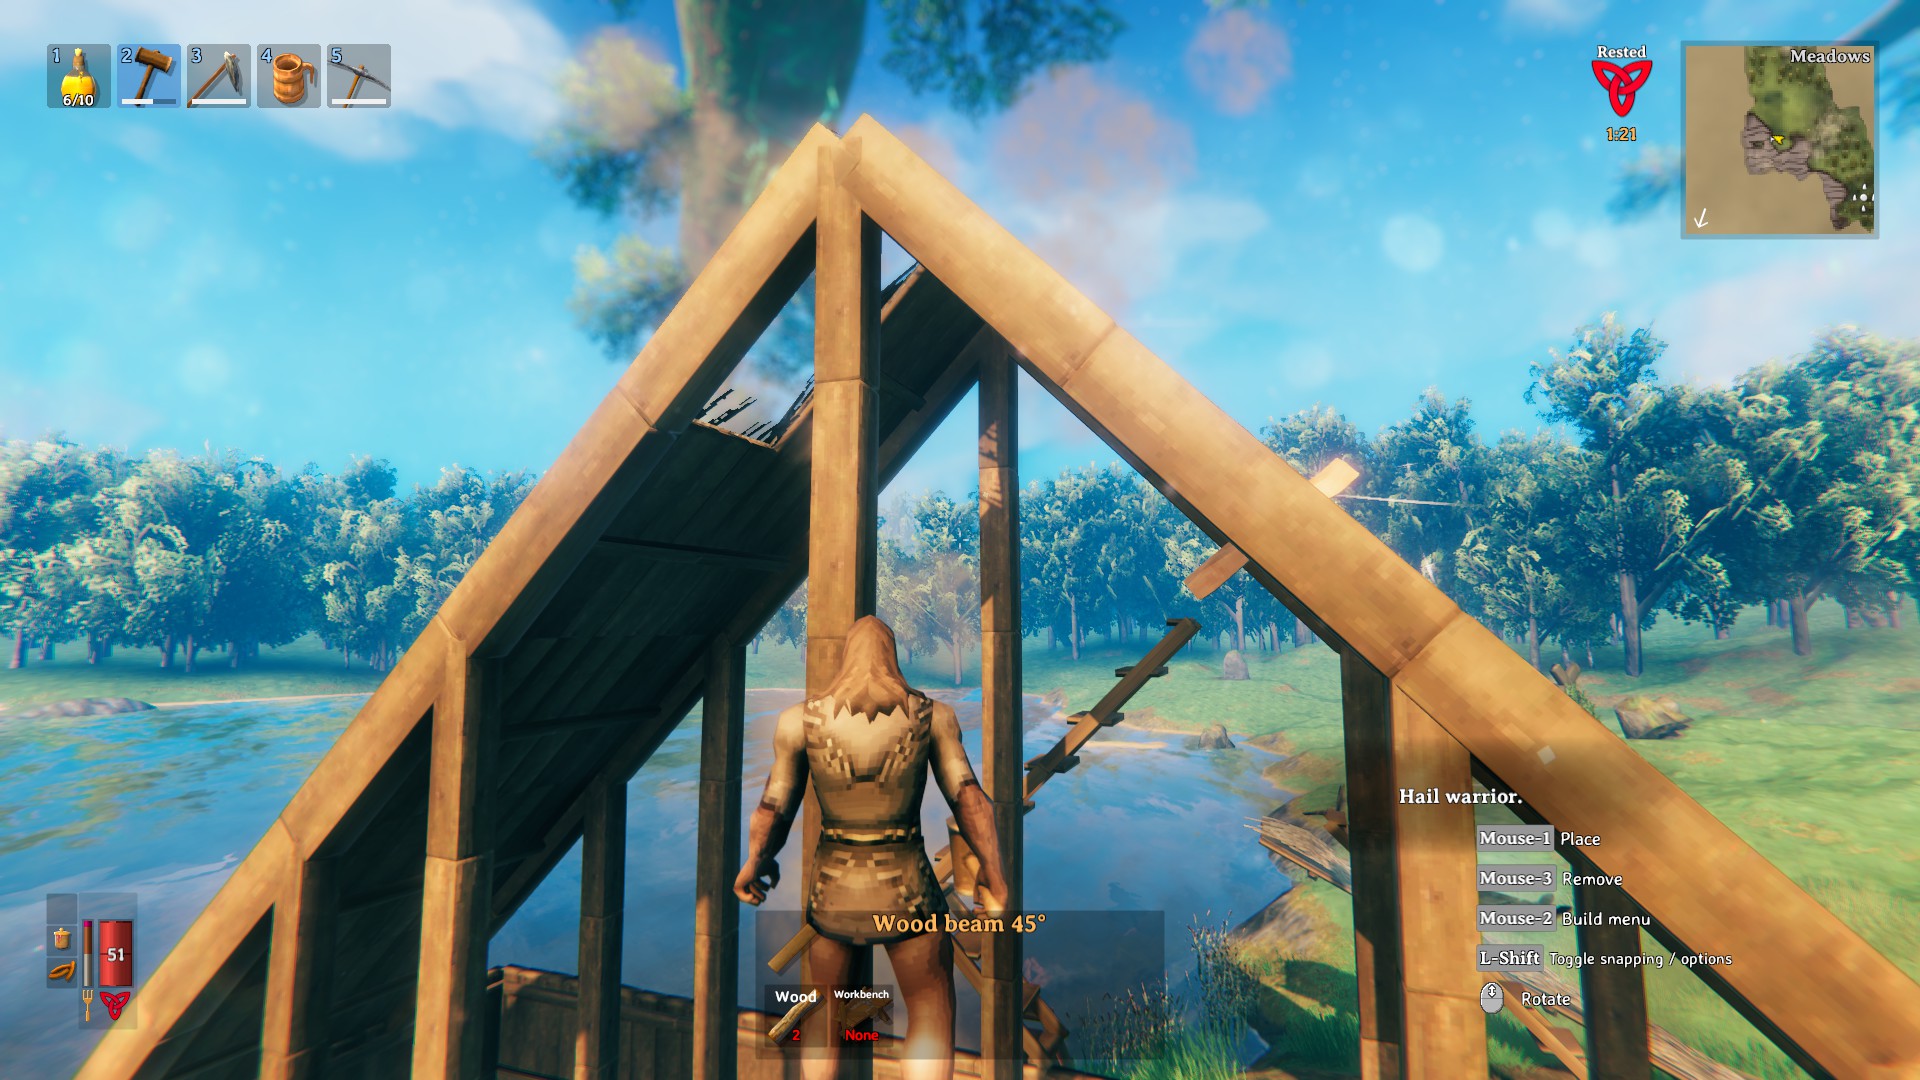
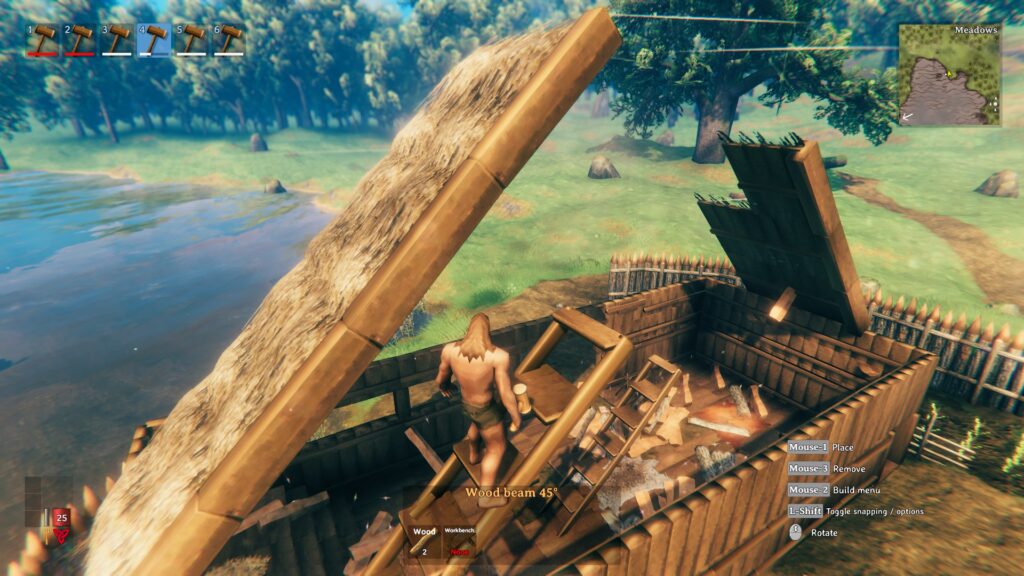
- Zaczniemy od najtrudniejszej części, czyli wysokiej, środkowej części. Zaczynając nie od rogu, ale od 2 środkowych odcinków krótki Koniec prostokąta swojego budynku, umieść 45 ° Kawałki dachu strzechą jeden na drugim, aż rozpadają się, gdy je umieścisz.
- Dodaj wiązkę drewna 45 ° kawałki po obu stronach dachówek.
- Teraz pojawia się trudna część: musisz zbudować pionowe kolumny wsporcze za pomocą 2 mln drewnianych kawałków od podkładu do dachu. Trudne jest to, że trudno jest powiedzieć, od czego zacząć na ziemi, więc zalecamy bardzo szybko zbudować się w dół – może się zapaść, ale nadal da ci wyobrażenie o tym, gdzie musisz zacząć od dołu. Pewne próby i błędy będą prawie na pewno wymagane. Pamiętaj, że w zależności od tego, co ostatecznie budujesz, możesz potrzebować mniej więcej wsparcia dla swojego dachu – na poniższych zdjęciach prawdopodobnie jest więcej wsparcia niż to konieczne.
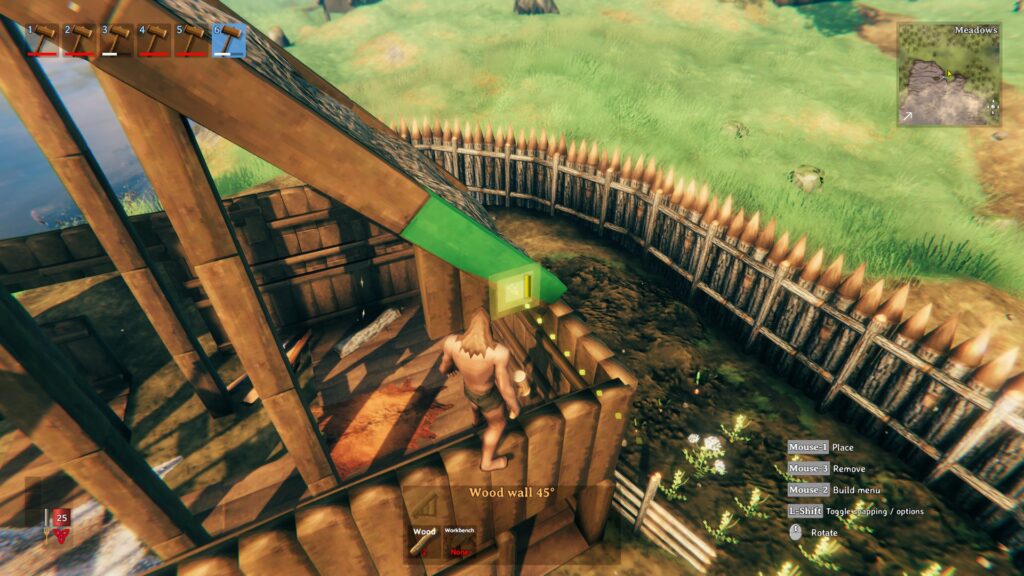
- Po wprowadzeniu wiązek wsporniczych powinieneś być w stanie podłączyć dachówki na szczycie. Nie zapomnij dodać drewnianej wiązki 45 ° kawałków, aby podtrzymywać kawałki dachu strzechy 45 °.
- W punkcie, w którym spotykają się sekcje dachu, rzuć drewniany dach 45 ° po obu stronach dachu, aby uzyskać ten autentyczny styl długotrwały.
- Teraz możesz wypełnić resztę otwartych sekcji z boku, używając elementów narożnych w każdym rogu, a ściany gdziekolwiek chcesz.

Mamy nadzieję, że ten przewodnik był pomocny i że twój Wiking jest teraz ciepły i suchy. Daj nam znać, jeśli jest coś, co myślisz, że przegapiliśmy, czy też są inne przewodniki Valheim, które chcesz zobaczyć!